I have a custom built Arch Linux server running all the time, running mostly Docker containers.
In this guide we will approach two situations. The first one will be how to do the initial setup of the Windows virtual machine with GPU passthrough. The second one will be how to change GPU and update the configuration.
In both paths, there will be step by step instructions with precise commands and examples.
Part 1: initial setup
I wanted to setup a Windows 10 virtual machine with GPU passthrough such that:
- I don’t have to run another Windows 10 machine to save on Hardware costs and electricity
- Friends without a gaming computer would be able to play on my server
- I could play on my server remotely (= no need to carry a mini ITX build at airports)
- It would be isolated from the rest of the server
For reference, my configuration is:
- Host OS:
Linux zenarch 5.14.16-arch1-1 #1 SMP PREEMPT Tue, 02 Nov 2021 22:22:59 +0000 x86_64 GNU/Linux(post updated from kernel5.7.7, 2020-07-01) - CPU: AMD Ryzen 2600x
- Motherboard: ASUS Strix X470-I
- GPU: MSI GTX 1660 Super
- RAM: 32GB
Pre-requisites
- A motherboard supporting UEFI (most modern motherboards do)
- A graphics card VBIOS supporting UEFI (most modern cards do)
- Access your server through SSH
- Run as
root, no time to wastesudoing everything
Motherboard UEFI configuration
- Virtualization enabled (a.k.a. VT-d or AMD-v or SVM mode)
- IOMMU enabled (for me, it was in Advanced/AMD CBS/NBIO Common Options/NB Configuration)
- Any kind of CSM completely disabled
Bootloader and IOMMU
The following is for GRUB, although similar instructions should apply to
systemd-boot (i.e. add amd_iommu=on iommu=pt to the options line in your
boot entry file).
Modify
/etc/default/grubchanging:GRUB_CMDLINE_LINUX_DEFAULT="loglevel=3 quiet"to
GRUB_CMDLINE_LINUX_DEFAULT="loglevel=3 quiet amd_iommu=on iommu=pt video=efifb:off"If you have an Intel CPU, use
intel_iommuinstead ofamd_iommu.Rebuild the Grub config
grub-mkconfig -o /boot/grub/grub.cfgReboot
poweroff --rebootCheck the Linux kernel ring buffer
dmesg | grep -i -e DMAR -e IOMMUYou should see something similar to:
[    0.000000] Command line: BOOT_IMAGE=/boot/vmlinuz-linux root=UUID=d086663a-xxxxx-xxx rw loglevel=3 quiet amd_iommu=on iommu=pt
[    0.000000] Kernel command line: BOOT_IMAGE=/boot/vmlinuz-linux root=UUID=d086663a-xxxx-xxx rw loglevel=3 quiet amd
iommu=on iommu=pt
[    0.173349] iommu: Default domain type: Passthrough (set via kernel command line)
[    0.282985] pci 0000:00:00.2: AMD-Vi: IOMMU performance counters supported
[    0.283054] pci 0000:00:01.0: Adding to iommu group 0
[    0.283071] pci 0000:00:01.1: Adding to iommu group 1
[    0.283086] pci 0000:00:01.3: Adding to iommu group 2
...
...
...
[    0.283703] pci 0000:0a:00.3: Adding to iommu group 21
[    0.283938] pci 0000:00:00.2: AMD-Vi: Found IOMMU cap 0x40
[    0.284262] perf/amd_iommu: Detected AMD IOMMU #0 (2 banks, 4 counters/bank).
[    0.292351] AMD-Vi: AMD IOMMUv2 driver by Joerg Roedel <jroedel@suse.de>
Find your IOMMU group
Find the group your GPU belongs to.
Save a file
script.shwith content#!/bin/bash shopt -s nullglob for g in /sys/kernel/iommu_groups/*; do echo "IOMMU Group ${g##*/}:" for d in $g/devices/*; do echo -e "\t$(lspci -nns ${d##*/})" done; done;Run it
chmod +x script.sh
./script.sh
You should obtain something similar to
IOMMU Group 0:
        00:01.0 Host bridge [0600]: Advanced Micro Devices, Inc. [AMD] Family 17h (Models 00h-1fh) PCIe Dummy Host Bridge [1022:1452]
...
...
...
IOMMU Group 15:
        08:00.0 VGA compatible controller [0300]: NVIDIA Corporation TU116 [GeForce GTX 1660 SUPER] [10de:21c4] (rev a1)
        08:00.1 Audio device [0403]: NVIDIA Corporation TU116 High Definition Audio Controller [10de:1aeb] (rev a1)
        08:00.2 USB controller [0c03]: NVIDIA Corporation Device [10de:1aec] (rev a1)
        08:00.3 Serial bus controller [0c80]: NVIDIA Corporation TU116 [GeForce GTX 1650 SUPER] [10de:1aed] (rev a1)
...
...
...
IOMMU Group 9:
        00:08.0 Host bridge [0600]: Advanced Micro Devices, Inc. [AMD] Family 17h (Models 00h-1fh) PCIe Dummy Host Bridge [1022:1452]
Here the group we want is group
15. If you have something unusual, see this.
Binding devices to VFIO-PCI
We need to bind all devices of the IOMMU Group 15 to the VFIO PCI driver at boot.
Edit
/etc/default/grubchanging:GRUB_CMDLINE_LINUX_DEFAULT="loglevel=3 quiet amd_iommu=on iommu=pt video=efifb:off"to (replacing the IDs from device IDs you obtained above)
GRUB_CMDLINE_LINUX_DEFAULT="loglevel=3 quiet amd_iommu=on iommu=pt video=efifb:off vfio-pci.ids=10de:21c4,10de:1aeb,10de:1aec,10de:1aed"Rebuild the Grub config
grub-mkconfig -o /boot/grub/grub.cfg
Kernel modules
Modify
/etc/mkinitcpio.confand addvfio_pci vfio vfio_iommu_type1 vfio_virqfdto yourMODULESarray.For example, change from
MODULES=()to
MODULES=(vfio_pci vfio vfio_iommu_type1 vfio_virqfd)Regenerate the initramfs with
mkinitcpio -p linux
Reboot and check
Reboot
poweroff --rebootCheck the VFIO kernel module got loaded:
dmesg | grep -i vfioShould output
[    0.000000] Command line: BOOT_IMAGE=/boot/vmlinuz-linux root=UUID=d086663a-9179-48c6-9946-1035da860829 rw loglevel=3 quiet amd_iommu=on iommu=pt vfio-pci.ids=10de:21c4,10de:1aeb,10de:1aec,10de:1aed
[    0.000000] Kernel command line: BOOT_IMAGE=/boot/vmlinuz-linux root=UUID=d086663a-9179-48c6-9946-1035da860829 rw loglevel=3 quiet amd_iommu=on iommu=pt vfio-pci.ids=10de:21c4,10de:1aeb,10de:1aec,10de:1aed
[    3.396953] VFIO - User Level meta-driver version: 0.3
[    3.400366] vfio-pci 0000:09:00.0: vgaarb: changed VGA decodes: olddecodes=io+mem,decodes=io+mem:owns=io+mem
[    3.416692] vfio_pci: add [10de:21c4[ffffffff:ffffffff]] class 0x000000/00000000
[    3.433353] vfio_pci: add [10de:1aeb[ffffffff:ffffffff]] class 0x000000/00000000
[    3.450019] vfio_pci: add [10de:1aec[ffffffff:ffffffff]] class 0x000000/00000000
[    3.466953] vfio_pci: add [10de:1aed[ffffffff:ffffffff]] class 0x000000/00000000
You can check for example that the device ID
10de:21c4got added with:lspci -nnk -d 10de:21c4Showing
09:00.0 VGA compatible controller [0300]: NVIDIA Corporation TU116 [GeForce GTX 1660 SUPER] [10de:21c4] (rev a1)
        Subsystem: Micro-Star International Co., Ltd. [MSI] Device [1462:c75a]
        Kernel driver in use: vfio-pci
        Kernel modules: nouveau
Virtual machine requirements
Install necessary packages
pacman -Sy --noconfirm qemu libvirt virt-install edk2-ovmf dnsmasqqemuis the machine emulator and virtualizerlibvirtis a wrapper aroundqemuso we can use a user interface to configure the virtual machinevirt-installis needed to install the VM using the cockpit web user interfaceedk2-ovmfso the virtual machine can run an UEFI firmwarednsmasqis needed to configure the network for the virtual machine
Enable and start the libvirtd service and its logging component virtlogd.socket
systemctl enable --now libvirtd
systemctl enable --now virtlogd.socket
Activate the default virtual network
virsh net-start default
Virtual machine management GUI
We will setup the Cockpit Web user interface (by RedHat), which is quite better than the older virt-manager.
Install required packages
pacman -Sy --noconfirm cockpit cockpit-machines udisks2-qt5 packagekitEnable and run the cockpit service
systemctl enable --now cockpit.socketAssuming your server is at
192.168.1.2, access it at https://192.168.1.2:9090 and login using your system credentials, ideally withroot.
Download the Windows 10 iso
- Go to https://www.microsoft.com/en-us/software-download/windows10ISO
- Select the Windows 10 edition, language and architecture you want to download the iso file.
- Rename it to
Windows10.isoand place it somewhere on your server.
Virtual machine configuration
Creating the virtual machine
For storage, you can either use a disk image which you can store anywhere you want or use a full disk or partition.
If you want to use a disk, create a storage pool https://192.168.1.2:9090/machines#/storages
using the disk, and then create a volume with format none.
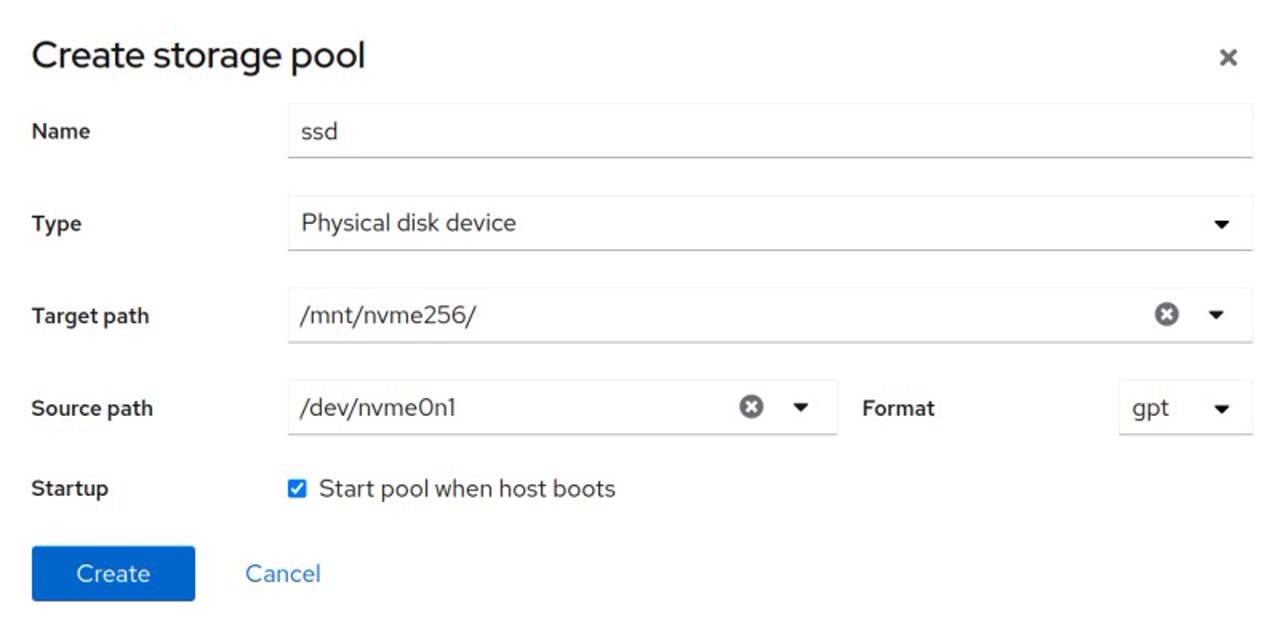
Click on the created storage pool and click on Activate.
Head to the machine Cockpit web UI at https://192.168.1.2:9090/machines and click on Create VM on the right hand side. Set the fields similarly to the below screenshot:
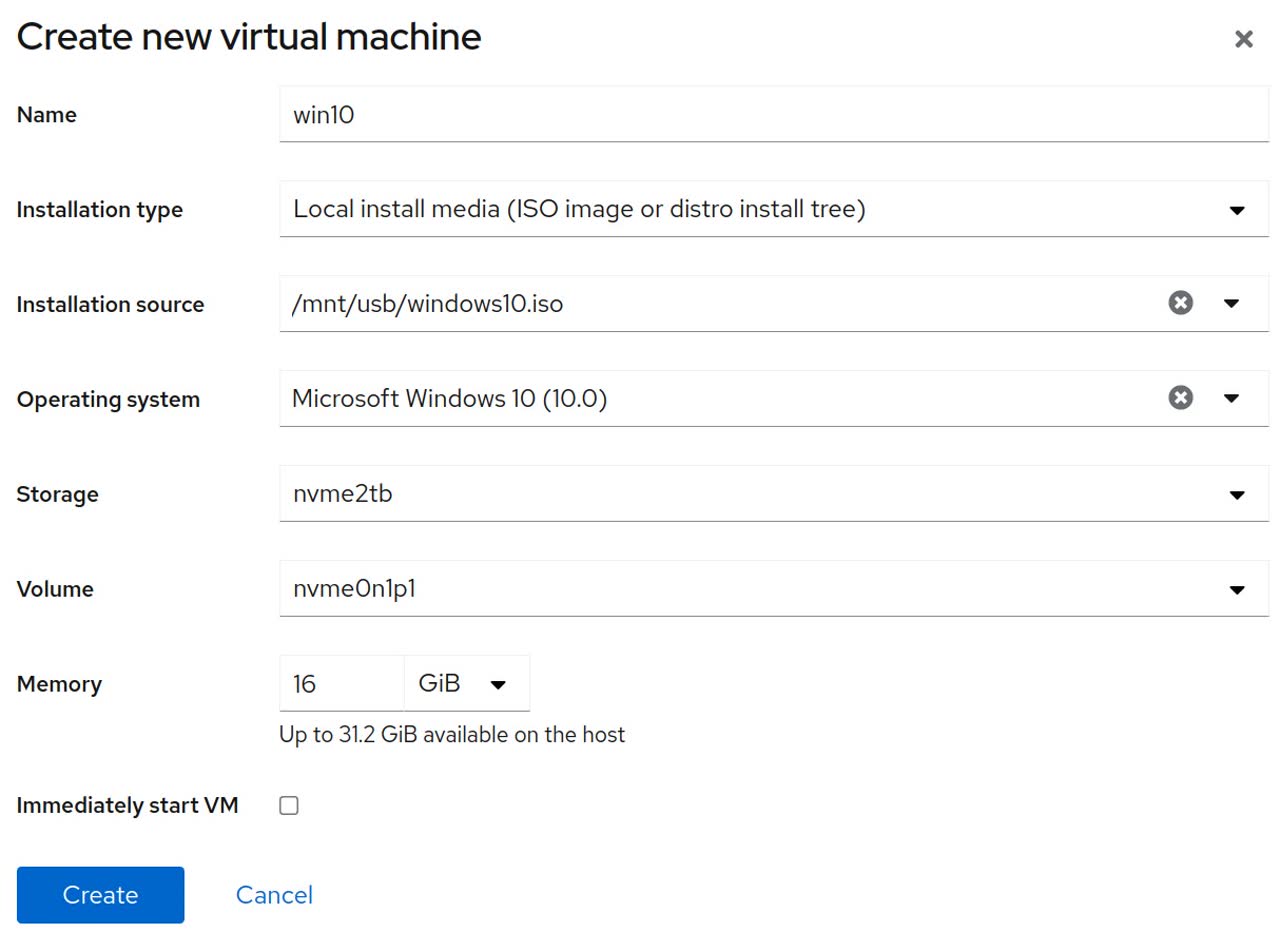
Then click on the VM name, here it’s win10, to show a more detailed menu. This should be at https://192.168.1.2:9090/machines#vm?name=win10.
- Edit the number of vCPUs from
2to another number if you want. Ideally set the same amount of threads per core your CPU has physically (usually 2 per core). - Edit the CPU type to
host-passthrough - Edit the firmware from
BIOStoUEFI
Click on Install at the top. That will boot from the ISO file you selected earlier.
A VNC console screen will appear on the right hand side, click on it and press a key to boot from the ISO file.
You can then follow Windows installation steps interactively.
VFIO Windows setup
Once you are done setting up Windows 10, in the virtual machine:
- Download the Virtio drivers for Windows 10 and install it.
- Download the Nvidia/AMD drivers for your graphics card but do not install it yet.
- Download and install Parsec as a machine level installation.
- Log in to your Parsec account.
- Configure Parsec to start with Windows
- Shut down the virtual machine.
Hide the VM
We will edit the Windows 10 libvirt xml file to hide away we are running in a virtual machine so graphics drivers won’t detect that we are running in a virtual machine.
Open your editor with
virsh edit win10
All the following modifications have to be done in the block
<features>
  ...
</features>
Add the following in the
<features>XML block<ioapic driver='kvm'/>Add the following in the
<features>XML block<kvm> <hidden state='on'/> </kvm>Make the Hyperv vendor ID random, by adding to the
<hyperv>XML block:<vendor_id state='on' value='123412341234'/>
The DUMMY PLUG
You will likely need to plug a cable in your graphics card in order to use it, for example with Parsec. To do so, you can either plug an actual screen or you can buy a ‘HDMI Dummy Plug’ and plug it (what I use).

Add the Graphics card
Go to the cockpit web UI at https://192.168.1.2:9090
Click on the virtual machine win10 https://192.168.1.2:9090/machines#vm?name=win10
Click on the Add host device button in the Host devices section
Select PCI and tick all the devices related to the graphics card. It should be trivial to spot all devices of NVIDIA corporation for example. If you want to ensure these are the right ones, compare their hardware ID on the rightmost column with the ones you got earlier in the IOMMU group.
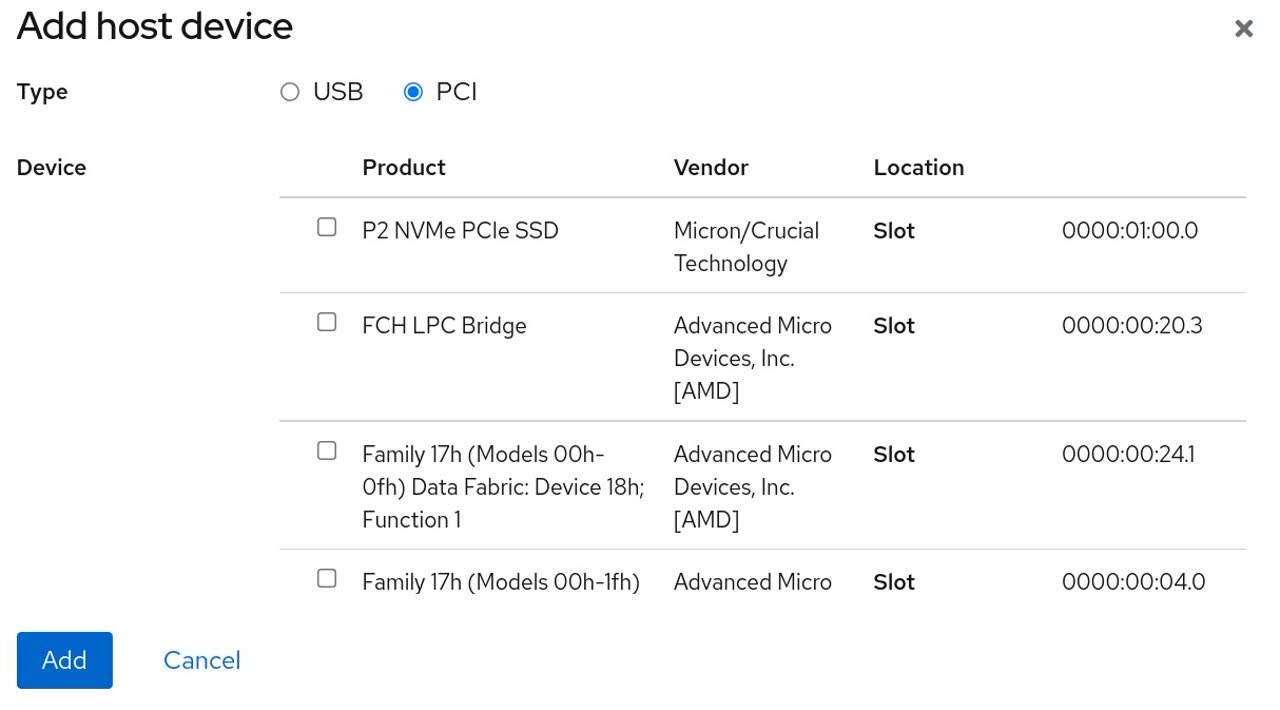
Click Add
Start the virtual machine
Using the VNC console, install the Nvidia/AMD drivers now
Shut down the virtual machine ⏹️
Remove unneeded devices
In the Cockpit web UI virtual machine settings, you can now remove the cdrom ‘Disk’.
You can also connect to the VM using Parsec and disable the primary second display used by the VNC viewer.
Final steps
- Boot the virtual machine
- Install Parsec on your client device, log in and connect to your virtual machine
- Profit 🎉 🎆 🎉
Part 2: upgrade your graphics card
Fortunately for me, I managed to buy an RTX 3070 in those dark times of early 2021.
I thus decided to upgrade my GTX 1660 Super to my RTX 3070 so I could play in 1440p better or even in 4k 30fps if the bandwidth allows it, such as inside my LAN in my living room.
We assume you have the same prequisites and configuration from Part 1
Cleanup
Windows 10 VM
Log in to your Cockpit web UI at https://192.168.1.2:9090
Shutdown the Windows 10 virtual machine
Click on win10 and head to the Host devices section.
Remove each of the host PCI devices of the card you want to remove. In my case I had to click on Remove for each of these:
PCI 0000:08:00.0PCI 0000:08:00.1PCI 0000:08:00.2PCI 0000:08:00.3
Remove the PCI VFIO device bindings
Edit
/etc/default/grubchanging:GRUB_CMDLINE_LINUX_DEFAULT="loglevel=3 quiet amd_iommu=on iommu=pt video=efifb:off vfio-pci.ids=10de:21c4,10de:1aeb,10de:1aec,10de:1aed"back to
GRUB_CMDLINE_LINUX_DEFAULT="loglevel=3 quiet amd_iommu=on iommu=pt video=efifb:off"Rebuild the Grub config
grub-mkconfig -o /boot/grub/grub.cfg
Power off the machine
poweroff
Changing the graphics card
Simply (or not) change the graphics card.
In my case, I changed it from an MSI GTX 1660 Super to an MSI RTX 3070 2X Ventus OC.
Finally, boot the computer.
Find the new IOMMU group
Find the group your new GPU belongs to.
Save a file
script.shwith content#!/bin/bash shopt -s nullglob for g in /sys/kernel/iommu_groups/*; do echo "IOMMU Group ${g##*/}:" for d in $g/devices/*; do echo -e "\t$(lspci -nns ${d##*/})" done; done;It should be trivial to spot all devices of NVIDIA corporation for example.
Run it
chmod +x script.sh
./script.sh
You should obtain something similar to
IOMMU Group 0:
        00:01.0 Host bridge [0600]: Advanced Micro Devices, Inc. [AMD] Family 17h (Models 00h-1fh) PCIe Dummy Host Bridge [1022:1452]
...
...
...
IOMMU Group 16:
        08:00.0 VGA compatible controller [0300]: NVIDIA Corporation Device [10de:2484] (rev a1)
        08:00.1 Audio device [0403]: NVIDIA Corporation Device [10de:228b] (rev a1)
...
...
...
IOMMU Group 9:
        00:08.0 Host bridge [0600]: Advanced Micro Devices, Inc. [AMD] Family 17h (Models 00h-1fh) PCIe Dummy Host Bridge [1022:1452]
This time the group we want is group
16. If you have something unusual, see this.
Re-binding devices to VFIO-PCI
We need to bind all devices of the IOMMU Group 16 to the VFIO PCI driver at boot.
Edit
/etc/default/grubchanging:GRUB_CMDLINE_LINUX_DEFAULT="loglevel=3 quiet amd_iommu=on iommu=pt video=efifb:off"to (replacing the IDs from device IDs you obtained above)
GRUB_CMDLINE_LINUX_DEFAULT="loglevel=3 quiet amd_iommu=on iommu=pt video=efifb:off vfio-pci.ids=10de:2484,10de:228b"Rebuild the Grub config
grub-mkconfig -o /boot/grub/grub.cfg
Reboot and check the new VFIO PCI ids are mentioned
Reboot
poweroff --rebootReconnect with SSH and check the VFIO kernel module got loaded:
dmesg | grep -i vfioShould output
[    0.000000] Command line: BOOT_IMAGE=/boot/vmlinuz-linux root=UUID=d086663a-9179-48c6-9946-1035da860829 rw loglevel=3 quiet amd_iommu=on iommu=pt video=efifb:off vfio-pci.ids=10de:2484,10de:228b
[    0.000000] Kernel command line: BOOT_IMAGE=/boot/vmlinuz-linux root=UUID=d086663a-9179-48c6-9946-1035da860829 rw loglevel=3 quiet amd_iommu=on iommu=pt video=efifb:off vfio-pci.ids=10de:2484,10de:228b
[    3.395726] VFIO - User Level meta-driver version: 0.3
[    3.399043] vfio-pci 0000:08:00.0: vgaarb: changed VGA decodes: olddecodes=io+mem,decodes=io+mem:owns=none
[    3.413368] vfio_pci: add [10de:2484[ffffffff:ffffffff]] class 0x000000/00000000
[    3.430080] vfio_pci: add [10de:228b[ffffffff:ffffffff]] class 0x000000/00000000
You can check for example that the device ID
10de:2484got added with:lspci -nnk -d 10de:2484Showing
08:00.0 VGA compatible controller [0300]: NVIDIA Corporation Device [10de:2484] (rev a1)
        Subsystem: Micro-Star International Co., Ltd. [MSI] Device [1462:3909]
        Kernel driver in use: vfio-pci
        Kernel modules: nouveau
Modify the virtual machine definitions
- Go to the cockpit web UI at https://192.168.1.2:9090
- Click on the virtual machine win10 https://192.168.1.2:9090/machines#vm?name=win10
- Click on the Add host device button in the Host devices section
- Select PCI and tick all the devices related to the graphics card you want to add. If you want to ensure these are the right ones, compare their hardware ID on the rightmost column with the ones you got earlier in the IOMMU group.
- Start the virtual machine ⏯️
- You can now connect to it using Parsec as before, and… profit again! 🎉 🎆 🎉
References
- Arch Linux Wiki on PCI Passthrough via OVMF
- blog.zerosector.io article on KVM QEMU Windows 10 GPU Passthrough
- Vanities' Github on GPU passthrough Arch Linux to Windows 10
Further work
Automate the setup with virsh to avoid relying on the Cockpit web UI. For example:
virt-install -n gaming \
  --description "Gaming VM with VFIO" \
  --os-type=Windows \
  --os-variant= \
  --ram=8096 \
  --vcpus=4 \
  --disk path=/var/lib/libvirt/images/myRHELVM1.img,bus=virtio,size=250 \
  --cdrom=.iso \
  --dry-run
  ...
Comments